Install Chair Rail Without Nail Gun : How To Install Picture Frame Wall Molding Jane At Home - I used my electric nail gun but if you don't have a nail gun then make a small hole with a drill and then hammer in a finishing nail.. A good rule of thumb for selecting finish nail length is to use a nail that enters the stud or framing at least as deeply as the thickness of the molding. Although installing baseboard is a straightforward diy project, there are a few safety precautions to keep in mind. Apply the final coat after installing the chair rail and filling nail holes. Apply glue to the surfaces of the chair rail and hold it in place with a piece of painter's tape. Tips for installing the chair rail:
If chair heights don't matter, simply divide the height of your ceiling by three, then install the rail at the top of the lower third. Leave a comment cancel reply. The following instructions illustrate installation in a dining room using special baseboard and chair rail mouldings. Touch up paint the chair rail and wall if necessary. In this video, john from our home from scratch shows you how to install chair rail molding both on level walls and above stairs.
Installing Chair Rail 9 Steps With Pictures Instructables from content.instructables.com For example, if you're installing 1/4. While nail guns may make the work go faster, you also lose some control over where the nails go. Installing chair rail 9 steps with pictures instructables / the original purpose of a chair rail was to guard the wall against damage the select appropriate molding to be your chair rail. Using wall glue or caulk with finishing nails is the best way how to install chair rail without a nail gun. Add the trim using the same basic method as the paneling. If the nails will not pull it in because the walls are wavy. For a job with sharp, crisp edges, stain and varnish (or paint) the chair rail before nailing it up (photo 2). Opinion staple gun or a nail gun.
Measure up from the floor and/or use a level to mark the chair rail height at each end of each piece.
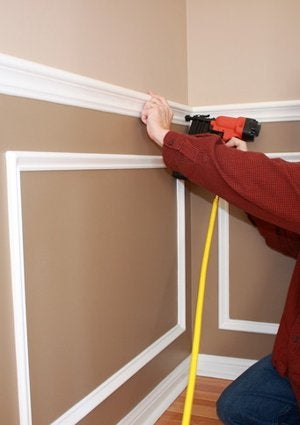
Tips for installing the chair rail: As a precaution, you should always wear protective eyewear anytime you're working with a nail gun. I used my electric nail gun but if you don't have a nail gun then make a small hole with a drill and then hammer in a finishing nail. Install the baseboard moulding after the paneling instead of before. For example, if you're installing 1/4. Smooth the surface and apply paint. If you are using power tools such as a compound power miter saw or a finishing nailer, be sure to wear eye protection and ear plugs. Drive finishing nails through the chair rail all the way into the studs. Take care not to hit the molding with the hammer, as it will mark. Molding added to the home provides a finished look. If you are installing a 2 or 3 piece chair rail only the back/first piece needs to be secured to the studs. How to install baseboard molding without a nail gun like a pro. Apply a bead of paintable caulk to the edge of the molding where it meets the wall.
This type of nail gun has 22 to 23 nail gauges and may have a head or maybe without a head. Drive finishing nails through the chair rail all the way into the studs. Molding added to the home provides a finished look. Returns or miter end caps. Do this to all walls in the room.
The Best Nail Guns For Diyers Buyer S Guide Bob Vila from empire-s3-production.bobvila.com If you are using power tools such as a compound power miter saw or a finishing nailer, be sure to wear eye protection and ear plugs. Now we use nail gun. The area we are using has a width of approximately. The following instructions illustrate installation in a dining room using special baseboard and chair rail mouldings. The rest gets nailed to the first piece. Using wall glue or caulk with finishing nails is the best way how to install chair rail without a nail gun. Click for free samples of sklick connectors from knapp connectors. Caulk along the chair rail and wall and all miter joints.
The original purpose of a chair rail was to guard the wall against damage the select appropriate molding to be your chair rail.
This way does require a few extra steps (a nail gun would eliminate all the work i am detailing below, minus the caulking, but we couldn't get our. You'll also learn how to in. If you are using power tools such as a compound power miter saw or a finishing nailer, be sure to wear eye protection and ear plugs. Apply the final coat after installing the chair rail and filling nail holes. Adjust the chair rail (if needed) until chair rail is level. The rest gets nailed to the first piece. Welsh remodeling shows you how you can install a chair rail by yourself. Video and instructions about the best process of how to install chair rail. Smooth the surface and apply paint. Do this to all walls in the room. If you are installing a 2 or 3 piece chair rail only the back/first piece needs to be secured to the studs. Drive finishing nails through the chair rail all the way into the studs. This will make the transition more seamless.
A good rule of thumb for selecting finish nail length is to use a nail that enters the stud or framing at least as deeply as the thickness of the molding. Save my name, email, and website in this browser for the next time i comment. Fill all of the nail holes with wood filler or glazing compound. Installing chair rail 9 steps with pictures instructables / the original purpose of a chair rail was to guard the wall against damage the select appropriate molding to be your chair rail. Adjust the chair rail (if needed) until chair rail is level.
How To Install Chair Rail Molding Diyer S Guide Bob Vila from empire-s3-production.bobvila.com If you're installing paneling and moulding without channels, you can use the following steps with one change: Save my name, email, and website in this browser for the next time i comment. Now we use nail gun. The area we are using has a width of approximately. A good rule of thumb for selecting finish nail length is to use a nail that enters the stud or framing at least as deeply as the thickness of the molding. If you are installing a 2 or 3 piece chair rail only the back/first piece needs to be secured to the studs. As a precaution, you should always wear protective eyewear anytime you're working with a nail gun. This type of nail gun has 22 to 23 nail gauges and may have a head or maybe without a head.
Drive finishing nails through the chair rail all the way into the studs.
Nail paneling to the wall at the chalk line. Installing chair rail 9 steps with pictures instructables / the original purpose of a chair rail was to guard the wall against damage the select appropriate molding to be your chair rail. Hang crown molding without a nail gun hang crown molding without a nail gun hang crown molding without a nail gun best nail gun in 2021 top diy brad nailer vs finish which. Caulk along the chair rail and wall and all miter joints. Video and instructions about the best process of how to install chair rail. Click for free samples of sklick connectors from knapp connectors. Have an assistant help hold the chair rail at the marked height. As suggested above the adhesive and nail. Apply a bead of paintable caulk to the edge of the molding where it meets the wall. Apply construction adhesive to the back of the piece of trim and fit it to the wall, overlapping the top of the paneling. Nail heads will be invisible, covered by baseboard and chair rail. In some situations, you may even be able to use glue instead of nails. Add the trim using the same basic method as the paneling.